Resistance Band Workout Plan for Beginners: An 8-Week Full Body Routine at Home
A coach-built, eight-week resistance band workout plan for beginners, with two full-body sessions, clear form cues, safe anchor checks and simple progression you can use at home.
Key takeaways
- Two full-body band sessions each week are enough for a beginner to build strength while learning reliable technique.
- Choose a band that lets you finish each set with two or three good repetitions still available rather than chasing the heaviest colour.
- Inspect bands and anchors before every session; never attach a band to a loose object, sharp edge or door that opens toward you.
- Progress one variable at a time: repetitions, band tension, range of motion, tempo or an extra set.
- Muscle fatigue is expected, but sharp pain, chest pain, faintness, sudden weakness or neurological symptoms are reasons to stop and seek appropriate care.
We started again with one light long-loop band, two anchor-free movements and a 24-minute session. During week one she learned to squat, row and press without the band dictating her position. By week eight she used a thicker loop for deadlifts, completed three clean sets of rows and carried shopping upstairs without pausing. The equipment had not changed much. The plan had.
This resistance band workout plan for beginners gives you that missing structure. It includes two full-body sessions, an optional short practice day and eight weeks of progression. You can complete almost all of it with a long loop band; a handled tube and door anchor are useful but not essential. The goal is not to collect dozens of exercises. It is to repeat a small number of useful patterns until your body can produce more force with control.
How resistance bands build strength
Muscles respond to tension, not to the logo on the equipment. A band stretches as you move and produces increasing resistance. That rising resistance is called a variable resistance profile: the exercise is usually easiest when the band is shortest and harder as it lengthens. In a band row, for example, your back and arms face the greatest band tension near the end of the pull. This differs from a dumbbell, whose mass stays constant even though leverage changes throughout the movement.
Bands can build muscle and strength when a set is challenging enough, covers a useful range of motion and becomes harder over time. Beginners often underestimate light-looking bands and then rush the final third of each repetition. A better set has controlled movement, steady breathing and an end point you could repeat. If you finish twelve repetitions and could immediately do twelve more, the exercise is practice rather than a strong training stimulus. If the band drags you out of position at repetition three, it is too demanding for that variation.
Free weights still offer advantages. Their load is easier to measure, they can provide substantial resistance at the beginning of a movement and heavy loading has a long evidence base. Bands are portable, inexpensive, quiet and adaptable to small spaces. They are not a lesser form of exercise; they are a tool with a different resistance curve. If you later want to combine tools, the dumbbell workout plan at home is a logical next step.
Choose the right resistance band and starting tension

Long loop bands
A continuous latex or synthetic rubber loop can be stood on, held, doubled or secured around a stable anchor. It works for squats, hinges, rows, presses and assistance exercises. For this plan, choose one light and one medium band if possible. Product colours are not standardised: a green band from one company may be lighter than a red band from another. Use the manufacturer’s force range only as a rough comparison, then judge the movement itself.
Handled tube bands
Tubes with handles are comfortable for rows, presses and curls. Sets often include a door anchor and clips that allow tubes to be combined. Check that clips close fully and handles are not cracked. Do not stack several tubes simply because the set allows it; combined tension rises quickly, and a crowded clip can hide wear. Start with one tube that keeps the movement smooth.
Mini bands and fabric hip bands
Small loops fit around the thighs, ankles or wrists. They are useful for lateral walks, bridges and shoulder drills, but their short length limits full-body pulling and pressing. A thick fabric band may feel comfortable against clothing but can be too stiff for a true beginner. Use mini bands as accessories after the main exercises, not as proof that your glutes need to burn before every squat.
The two-repetition test
Select a setup you can perform for the bottom of the prescribed range while keeping about two or three repetitions in reserve. In practical terms, finish the set and ask: “Could I complete two more with the same range, tempo and posture?” If the honest answer is no, reduce tension or shorten the set. If you could do five or more, increase tension slightly, stand farther from the anchor or choose the harder variation next time.
Band and anchor safety before every workout

- Run the relaxed band through your hands. Look for cracks, cuts, chalky patches, thinning, sticky areas or damage near handles and clips. Retire a questionable band rather than covering damage with tape.
- Clear sharp jewellery, rough flooring and furniture edges. Bands fail sooner when scraped, twisted against a corner or stored in direct sunlight and heat.
- Use a purpose-made anchor on the hinge side of a solid door so your pulling force closes the door more firmly. Lock the door if possible and tell other people not to open it.
- Never anchor to a loose chair, lightweight table, radiator, towel rail, door handle or object you have not load-tested. A heavy-looking object can still slide or tip.
- Test every setup with a short range and gentle pull. Keep your face out of the band’s line of recoil, especially during overhead work and exercises facing away from an anchor.
- Wear shoes when standing on a smooth latex loop. Place the band beneath the middle of each foot, not under the toes, and confirm equal lengths before loading it.
Your five-minute warm-up and effort guide
A warm-up should prepare you, not tire you out. Walk around the room or march in place for one minute. Complete six slow sit-to-stands, six hip hinges with hands on your thighs, six wall push-ups and eight easy band pull-aparts with a very light band. Finish with one practice set of the first two workout exercises at roughly half your normal tension. You should feel warmer and more coordinated, not stretched to your limit.
Use a simple effort scale from one to ten. Easy daily movement is around two or three. Most working sets in this programme should finish near seven or eight: challenging, but with two or three technically sound repetitions available. A ten means no further good repetition is possible. Beginners do not need to visit ten to improve. Leaving a small reserve makes technique easier to learn and keeps soreness from consuming the rest of the week.
Workout A: the anchor-free full-body foundation
Complete Workout A on Monday or any day followed by at least one easier day. Rest for 60 to 90 seconds between sets. In weeks one and two, perform two sets of each exercise. The session should take 25 to 35 minutes. Arrange the band before the set begins and release tension slowly when it ends; stepping out carelessly is when bands often roll or snap upward.
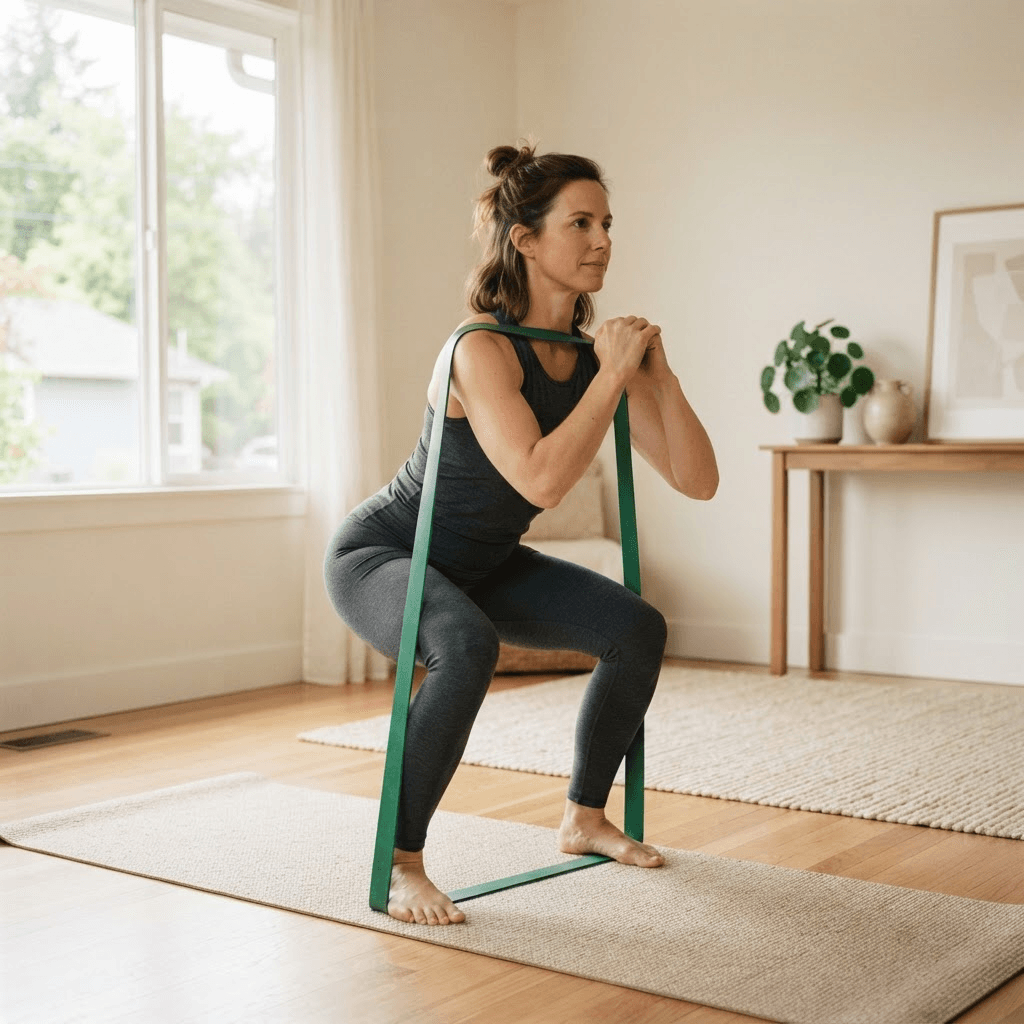
1. Resistance band squat
Stand on the centre of a long loop with feet about hip to shoulder width apart. Bring the upper part of the loop across the fronts of your shoulders and hold it with both hands. Sit your hips down and slightly back while your knees follow the direction of your toes. Keep your whole foot in contact with the floor. Descend only as far as you can control, then push the floor away and stand tall without leaning back. Perform 8 to 12 repetitions.
Make it easier or harder
Use a chair target and a lighter band if depth or balance is uncertain. To progress, use a thicker band, stand wider on the loop to shorten it, pause for one second near the bottom or hold the band higher. Do not advance all four at once.
2. Resistance band Romanian deadlift

Stand on the loop and hold one side in each hand. Soften your knees, push your hips behind you and let your torso tip forward as one unit. The band and your hands travel close to your legs. Stop when your hamstrings feel loaded or before your back position changes. Drive your feet down, bring your hips forward and stand tall. Perform 8 to 12 repetitions. If your lower back does most of the work, reduce tension and practise the hinge against a wall.
3. Seated resistance band row

Sit on the floor with legs extended and knees slightly bent. Loop the band around the middle of both feet and hold equal lengths. Begin with arms long and chest comfortably tall. Pull your elbows beside your ribs until your hands approach your torso, pause briefly and return over two seconds. Do not turn the row into a backward lean. If sitting on the floor is uncomfortable, sit on a firm chair and loop the band around a heavy foot-level anchor only if it is genuinely secure. Perform 10 to 15 repetitions.
4. Standing band chest press
Place the loop behind your upper back, below the shoulder blades, and hold an end in each hand. Stagger your feet and brace gently through your trunk. Press forward until your elbows are nearly straight, then return slowly until your hands are level with your chest. Keep wrists straight and shoulders away from your ears. If the band rubs your arms, wear a sleeved top or use a handled tube. Perform 8 to 12 repetitions.
5. Pallof-style standing hold without an anchor
For an anchor-free trunk exercise, stand on one end of the band with your right foot and hold the other end at chest height in both hands. Step your left foot slightly away so the band pulls diagonally. Press your hands forward and resist being pulled toward the standing foot. Hold for 15 to 25 seconds while breathing, then switch sides. The goal is stillness, not maximum stretch. Complete two holds per side.
Workout B: strength, pulling and single-leg control
Complete Workout B three or four days after Workout A. It introduces a split stance and an anchored pull. If you do not own a safe door anchor, repeat the seated row from Workout A. Two similar rows performed consistently are more valuable than a novel setup that you do not trust.
1. Split squat with band support
Stand in a long staggered stance with most of your weight through the front foot. Place the band under that foot and hold the ends near your shoulders. Lower the back knee toward the floor while the front knee tracks over the toes. Push through the front foot to rise. Use a wall or chair for light fingertip balance if needed. Perform 6 to 10 repetitions per side. Start without band tension if the stance itself is challenging.
2. Door-anchored standing row
Set the anchor near chest height on the hinge side of a locked door. Hold the handles or band ends, step back until slack disappears and stand tall. Pull your elbows toward your back pockets without thrusting your ribs forward. Return until your arms are long but shoulders remain controlled. Perform 10 to 15 repetitions. Step closer to reduce tension; step farther away only when the anchor and band remain secure.
3. Half-kneeling or standing overhead press
Place one end of the band beneath a foot and hold the other end at shoulder height on the same side. Press overhead without leaning sideways or arching aggressively. Lower to the shoulder over two seconds. If kneeling is comfortable, a half-kneeling stance can make compensation easier to notice; otherwise use a stable staggered stance. Perform 6 to 10 repetitions per arm. Skip overhead pressing if it causes sharp or escalating shoulder pain and use the chest press instead.
4. Banded glute bridge
Lie on your back with knees bent and a mini band just above the knees. Keep gentle outward pressure on the band, exhale and lift your hips until your body forms a comfortable line from shoulders to knees. Pause, then lower with control. Do not force height by arching your back. Perform 10 to 15 repetitions. Without a mini band, complete the same movement using bodyweight and add a two-second pause at the top.
5. Band pull-apart
Hold a light band at shoulder height with hands wider than shoulder width. Keep elbows soft and pull the band apart until it approaches your chest, then return slowly. Use a grip wide enough that your shoulders do not shrug and the band never touches your face. Perform 10 to 15 repetitions. This is an upper-back accessory, not a test of how far elastic can stretch.
The complete 8-week resistance band workout plan
| Weeks | Sets and effort | Progression target | Optional practice |
|---|---|---|---|
| 1–2 | 2 sets; finish with 3 reps in reserve | Learn setup and repeat the same range | 10-minute technique practice |
| 3–4 | 2 sets; finish with 2–3 reps in reserve | Add 1–2 reps per set within the range | Easy walk or mobility day |
| 5–6 | 3 sets for first 3 exercises; 2 for the rest | Increase band tension only after top reps are clean | One light circuit, 1 set each |
| 7 | 3 sets; finish with about 2 reps in reserve | Add a 1-second pause to squat, row and press | Recovery walk only |
| 8 | 2 sets early in week; repeat week 1 tests later | Compare reps, tension and technique without failure | No extra strength session |
Weeks 1–2: make the setup boring
Complete Workout A and Workout B once each. Keep three repetitions in reserve and write down the band, hand position and stance used. The first adaptation is procedural: you stop untangling equipment, know where to stand and can reproduce the movement. Soreness is not a score. If you are still significantly sore when the next session arrives, remove one set or use less tension.
Weeks 3–4: earn the top of the range
Add one repetition to a set when every current repetition looks alike. A squat prescribed for 8 to 12 might move from 8, 8 to 9, 8 and then 9, 9 across sessions. You do not need to increase every exercise at once. Smaller upper-body muscles may progress more slowly than squats and hinges. Keep the same band until you can complete the top of the range with two or three repetitions still available.
Weeks 5–6: add useful volume and tension
Add a third set to the first three exercises in each workout. For movements at the top of their range, increase tension by changing to the next band, widening your stance on a loop or moving a small step from an anchor. The jump may be larger than expected. If repetitions fall below the range or form changes, return to the previous tension and use a slower three-second lowering phase instead.
Weeks 7–8: consolidate and measure
In week seven, add a one-second pause in the hardest controllable position of the squat, row and press. Do not simultaneously increase resistance. At the start of week eight, complete two moderate sets rather than three. After two or three recovery days, repeat the exact band and setup used in week one for one comfortable test set. Stop when you estimate two good repetitions remain. More repetitions, a larger range or visibly steadier technique all count as progress.
Five ways to progress when band colours are inconsistent
- Add repetitions inside the written range. This is the simplest progression and the easiest to record.
- Increase pre-tension by shortening the band, widening your stance on it or stepping slightly farther from a secure anchor. Change position in small increments.
- Use a thicker band after reaching the top of the repetition range. Expect repetitions to fall temporarily and rebuild them gradually.
- Slow the lowering phase to three seconds or add a one-second pause. Tempo increases time under tension without requiring a different band.
- Add one set, usually moving from two to three. More is not automatically better; add volume only when you recover before the next session.
Record enough detail to recreate the exercise: band description, where your feet or hands were placed, anchor height, repetitions and approximate repetitions in reserve. “Medium green band” is weak data if the same band can be held at five different lengths. A note such as “green loop, shoulder-width stance, hands at shoulders, 10 reps with 2 left” is useful. Photographs of your setup can also help, provided you store them privately and do not interrupt the session to chase perfect angles.
Eight common resistance band mistakes
- Choosing by colour instead of performance. Colours vary between brands and tell you nothing about your control on a specific exercise.
- Starting with slack. A loose band can jerk when tension finally arrives. Begin with gentle tension while preserving a comfortable starting position.
- Racing the return. The band wants to shorten; controlling that return is part of the repetition and protects the setup from sudden recoil.
- Using the same band for every exercise. Your legs can usually tolerate more resistance than your shoulders and arms.
- Stretching a band beyond the manufacturer’s guidance. Extreme length increases failure risk and is not a substitute for buying appropriate resistance.
- Allowing wrists to collapse. Keep knuckles in line with forearms during rows and presses; change grip or use handles if the loop pinches.
- Turning every set into a burn challenge. Local burning reflects fatigue and metabolites, not automatically better strength or muscle growth.
- Changing the programme weekly. Repetition provides the comparison that makes progressive overload possible.
Troubleshooting discomfort, technique and recovery
The band rolls or pinches
Flatten a twisted loop before loading it, wear sleeves or trousers between latex and skin, and avoid placing mini bands directly over a joint. A fabric mini band can reduce rolling during lower-body exercises. If you have a latex allergy, use a clearly labelled latex-free product and confirm the material with the manufacturer rather than relying on appearance.
You feel an exercise in the wrong place
First reduce tension and range. Then check the movement goal. In a row, keep the torso still and guide elbows beside the ribs. In a hinge, move the hips backward before the knees bend deeply. In a press, keep wrists stacked and ribs controlled. Muscles besides the target will still contribute; an exercise does not need to create an isolated sensation to be effective. Sharp, electrical, escalating or joint-specific pain is different from muscular effort and should not be pushed through.
You are too sore for the next workout
Delayed muscle soreness can peak one or two days after unfamiliar training. Gentle walking and normal daily movement may feel better than complete inactivity, but they do not erase the need to recover. At the next session, reduce one set or lower tension. Aim for consistent sleep, regular meals and enough protein from foods that fit your preferences. Supplements are not required for this programme.
Nothing feels harder after four weeks
Check attendance before changing exercises. Six completed sessions from eight planned is a consistency issue, not a programme failure. If attendance is high, compare your notes. You may already be using a longer range, more repetitions or better control. If every measure is unchanged and sets finish with five or more repetitions available, increase one progression variable. Training must eventually become more demanding to keep producing adaptation.
How to schedule bands, cardio and recovery
| Day | Activity | Purpose |
|---|---|---|
| Monday | Workout A, 25–40 minutes | Full-body strength and skill |
| Tuesday | Easy walk, 20–30 minutes | Aerobic activity and recovery |
| Wednesday | Rest or 10-minute technique practice | Repeat only easy movements |
| Thursday | Workout B, 25–40 minutes | Full-body strength and control |
| Friday | Rest | Recover from resistance training |
| Saturday | Walk, cycle or swim at conversational pace | General cardiovascular health |
| Sunday | Rest or gentle mobility | Prepare for the next week |
Strength training supports health, but it does not replace aerobic activity. Public-health guidance recommends that adults accumulate regular moderate or vigorous aerobic activity and muscle-strengthening work on at least two days each week. Build toward those targets from your current capacity rather than treating them as a pass-fail test. The walking for weight loss guide explains how to increase walking volume without turning every outing into a hard workout.
A useful programme leaves room for your life. If a week becomes crowded, complete one set of each exercise rather than skipping everything. If sleep has been poor or illness is developing, reduce effort or rest. Eight calendar weeks are not magical; taking ten weeks to complete sixteen high-quality sessions is better than cramming missed workouts into weekends.
What results can you expect in eight weeks?
During the first few weeks, improvement is often neural and technical: you coordinate the movement better, recruit muscle more effectively and waste less effort stabilising the band. Repetitions become smoother before muscles look visibly different. By eight weeks, a consistent beginner may use greater tension, complete more repetitions, move through a larger range or recover faster between sets. The size of change varies with training history, age, nutrition, sleep, health and the starting exercise.
Visible muscle growth is possible but not guaranteed on a fixed timetable. Bands need to challenge the relevant muscles near the end of a set, and total food and protein intake must support recovery. Fat loss depends mainly on sustained energy balance, not on a special band movement. Judge this plan by strength measures first: a stronger band, more controlled repetitions, a harder variation or an everyday task that now feels easier.
A band becomes a training programme only when you can repeat the setup, measure the effort and make one small part harder.
What to do after week eight
Repeat the block with slightly higher starting tension if you are still progressing and enjoy the format. You can also replace one movement at a time: swap squats for split squats, seated rows for anchored rows, or bilateral presses for single-arm presses. Keep the movement pattern and change only enough to solve a real limitation. Variety is useful when it restores motivation or offers a needed progression, not when it prevents comparison.
If your goal shifts toward substantial muscle gain or maximal strength, bands can remain accessories while dumbbells, kettlebells or gym equipment provide a more measurable loading ceiling. The kettlebell full-body workout is a practical bridge to heavier home training. If equipment-free travel is the priority, move toward bodyweight variations. The correct next tool is the one that lets you keep applying progressive resistance safely and consistently.
References and further reading
These sources support the resistance-training, safety and physical-activity principles used in this guide. Links lead to the journal, professional organisation or public-health publisher.
- Resistance training prescription for muscle strength and hypertrophy in healthy adultsBritish Journal of Sports Medicine
- Physical activity guidelines for adultsWorld Health Organization
- Progression models in resistance training for healthy adultsMedicine & Science in Sports & Exercise
- Elastic resistance exercise training and muscular strengthSAGE Open Medicine
- Exercise preparticipation health screening recommendationsAmerican College of Sports Medicine
Resistance band training questions beginners ask most
Can beginners build muscle with resistance bands?
Yes. Resistance bands can build muscle when exercises challenge the target muscles through a useful range, sets finish reasonably close to fatigue and tension or volume increases over time. Beginners often respond well because the training stimulus is new. Bands do not need to feel identical to weights to create muscular tension.
How often should a beginner do resistance band workouts?
Two full-body sessions per week are an effective starting point. Leave at least one easier day between them. After several weeks, a third light practice or strength session can be added if soreness is manageable, technique remains steady and you recover before the next planned workout.
What resistance band should a beginner buy?
A light and medium long loop band offer the most versatile starting setup for squats, hinges, rows and presses. A handled tube with a purpose-made door anchor is a useful alternative. Because colours are not standardised, choose resistance by how well you can complete the prescribed repetitions with two or three good repetitions in reserve.
How long should a resistance band workout last?
A productive beginner session can last 25 to 40 minutes, including a brief warm-up. Session quality matters more than duration. Five exercises completed for two or three controlled sets provide enough work without requiring an hour-long circuit.
Do I need a door anchor for a full-body band workout?
No. Squats, deadlifts, seated rows, chest presses and several trunk exercises can be done by standing on the band, looping it around the body or securing it around both feet. A door anchor expands your rowing and pressing options, but it should be purpose-made and used only on the hinge side of a solid, locked door.
When should I move to a heavier resistance band?
Move up when you can complete the top of the repetition range with consistent technique and still have three or more repetitions available. A heavier band may be a large jump, so it is also valid to shorten the current band, add a pause, slow the lowering phase or add one set.
Is it normal to feel sore after resistance band training?
Mild muscle soreness for a day or two can occur after unfamiliar training, but it is not required for progress. Reduce the next session if soreness meaningfully changes how you move or has not settled. Sharp, severe or worsening pain, chest pain, faintness, sudden weakness or neurological symptoms require stopping and appropriate medical assessment.
Vitality Editorial Team
Vitality publishes practical fitness guidance based on cited sources and established public-health recommendations.
Medical disclaimer: This article is educational and general in nature. It is not a diagnosis, prescription or personalised training plan. Speak with a qualified healthcare professional before starting a new exercise programme, particularly if you have an existing condition, injury or are pregnant.